Sunday, November 24, 2013

Thanksgiving 2013!!!


Thanksgiving 2013 is only a few days away!!! This is my Christmas and Super Bowl wrapped into one day, I couldn't be more excited.  Is any one else hosting? Or will you get to bring a side dish to somewhere?  Keep reading for some great ideas and to find out what we'll be devouring.

The Plan: 9 guests - A little bit smaller crowd than last year
The Place: We have 5 place settings in the dining room and another 4 on a table we have set up on one half of the living room.  You do what you have to do.
The Time: honesly, I still haven't planned my day of time line, maybe 2? but they'll be apps in case it ends up being 3
The Bird: we've ordered a fresh turkey from Whole Foods which I'll be picking up tomorrow after work to start the dry brine!
To brine or not to brine: dry brining the bird!


The Menu

§  Cheese Plate with Walnut Loaf

§  Kale Artichoke Dip

§  "Monkey" Bread Rolls

§  Rosemary Lemon & Orange Turkey

§ Traditional Mashed Potatoes

§  Dad's Potato Stuffing

§  Roasted Root Vegetables 

§  Olive Oil Sauteed Green Beans

§  Baby Kale and Mixed Green Salad with Pomegranate Seeds


§  Apple Pie

§  Traditional Brownies

§  Chocolate Chip Cookies


     The plan this year was to keep things simple and traditional and ask for help where we need it.  Mom and Dad are helping with the potato stuffing and they'll be bringing the cheese for the cheese plate. Grammy and Uncle Mike are in charge or the mixed nuts for the cheese plate, white wine, and brownies.  And Jenny and Joe will hopefully bring some beer and the Apple Pie. 


How do you split up the meal?  I like to do the side dishes as well as the Turkey to keep all the flavors balanced.  But I sure love the help of appetizers, dessert, and drinks.  I'm hoping with this menu of very traditional items there will be a little less work in the kitchen, and more chatting and family time. 

What's your favorite part about the holiday?  Do you like to host?  I'm also looking forward to this years after dinner craft.  Last  year was candy turkeys!


I

Monday, November 18, 2013

Yard Sale Flip!

Because we're not busy enough with the biggest DIY ever I finally refinished one of our yard sale finds last weekend.  It was my first soup to nuts furniture renovation and now I'm hooked.  I did renovate the $5 Ethan Allen side table we featured in the completed guest bedroom, but now I realize spray paint isn't for everything.  
We found this very basic and very beat up oak coffee table at a yard sale around the corner.  And after paying our new neighbor $10 to take it off his hands Matt carried it home.  

Some quality prep work (which we've become quite good at thanks to having to prep and entire House!) and patience during the painting gave us a beautiful result.

Though I'd LOVE a coffee table more like this one from West Elm, we realize if we'd like to have a family soonish it's completely impractical and will be beat on ferociously.  A yard sale find painted with the addition of chalkboard paint will be fun for that time, but until then it will be super fun to label food when we entertain!
The project broke down like this:
Time:
2 Hours - sand all surfaces
1 Hour - prime
2 Hours - one coat of color and a few coats of chalkboard paint. 

Cost:
Coffee Table: $10
Primer: $1 (we had some Gildden Gripper left over, we probably used less than a dollars work.) A gallon is $22
Paint: $15 - we bought a quart of semi-gloss Behr Premium Ultra in BM Adam's Gold.  Hardly used any of it - but we did buy the paint just for the project.
Chalkboard Paint: $2 (again, used leftover)

Total: 5 hours and $28

Have you flipped anything scored at a yard sale lately?!  We have lots of wooden furniture items we've now collected in the basement, ready for a make over!

Monday, November 11, 2013

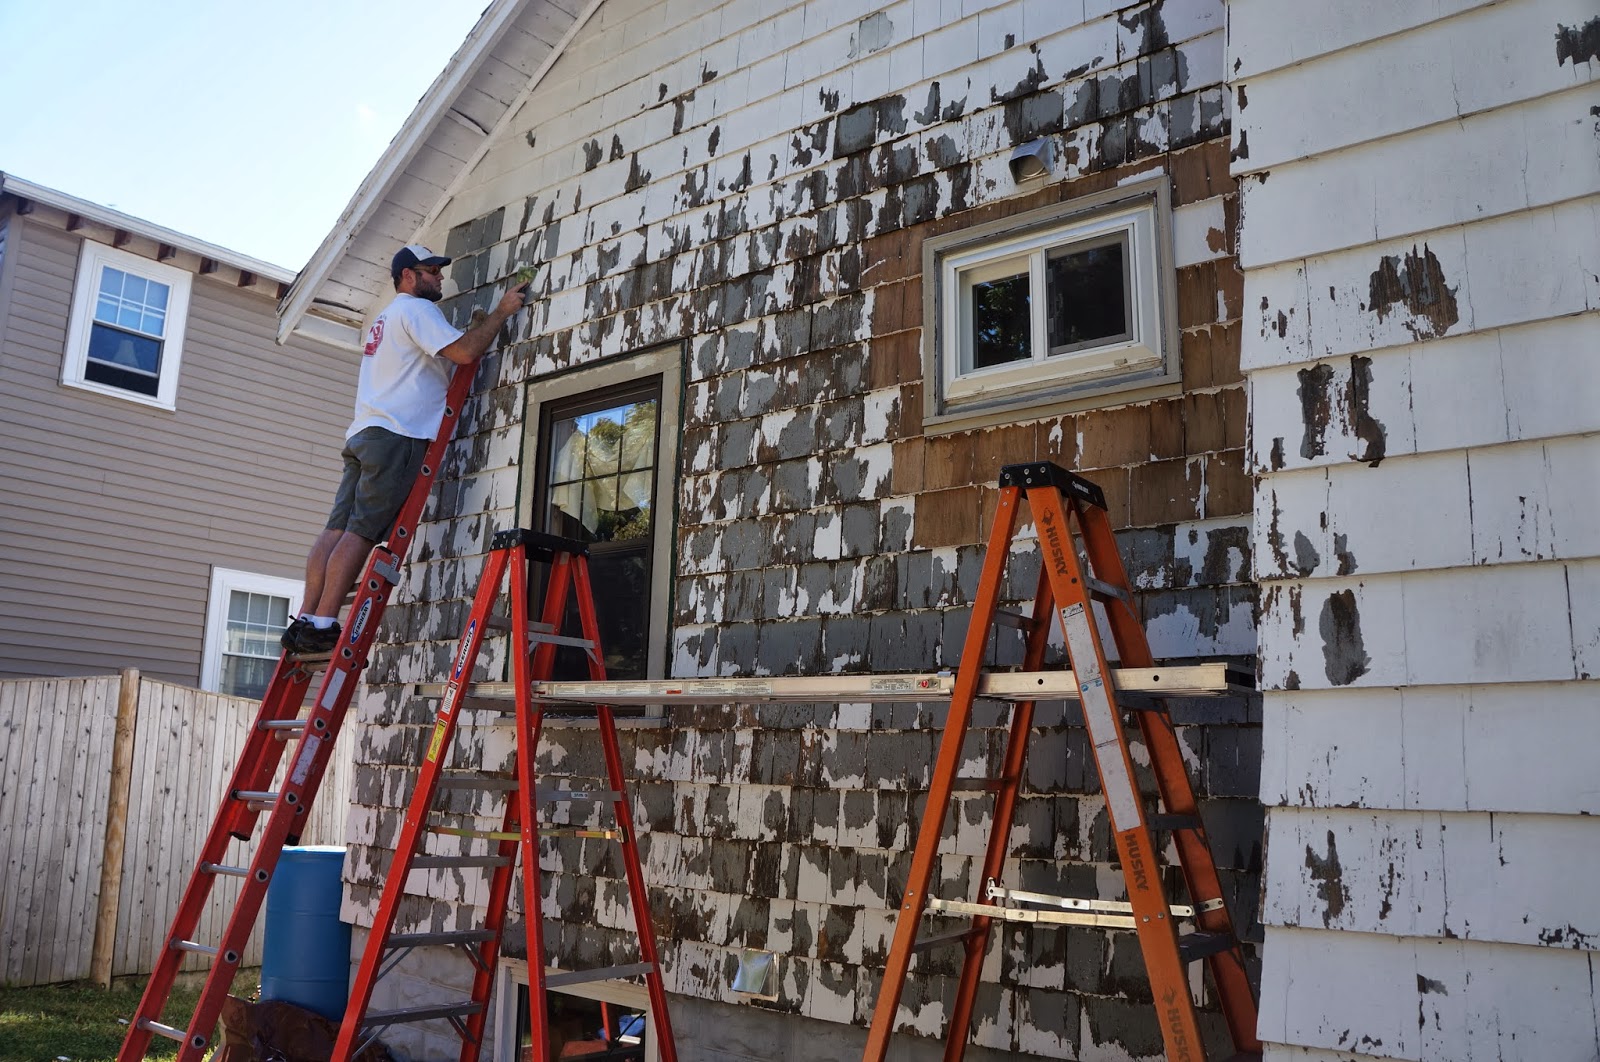
Progress on the Exterior - Sanding & Scraping

We said it once before - this is the biggest and hardest DIY we've taken on yet.  The past few weekends we've devoted every daylight hour to our exterior paint job project. 
I took our last to do list on this project and combined all the steps so you can see everything all at once.


Back of house - fully scraped
Project List:
  • Scrape any old paint that will come off
  • New paint colors selected
  • Finish the never ending scraping
  • Replace any broken shingles
  • New flashing above lower window
  • New PVC window trim
  • Sand all cedar shingles
  • Prime everything - 75% complete as of 11/11
  • Flash AC unit
  • Correct bad flashing job on porch roof (wait until spring when we hire a pro and do a new roof here anyway)
  • Final coat of paint (if this can't happen, we'll need to prime again in the spring)
  • New fascia boards along eave (waiting until spring)
Dad flashes an exterior window the right way
Luckily we've been getting a bit of help from my Dad.  Between the three of us I've estimated we've logged about 150 man hours of very difficult labor.  
Matt finishing sanding

We also wanted to take this post to share with you the tools we've liked the most while tacking this project.

Scraping Tools:
Huskey bend scraper - Matt's choice 
Huskey 14 in 1 tool - Meg's choice
Safety Glasses - we wear safety glasses alot around here, splurge and get yourself a good pair.  These are Meg's favorite.

Sanding Tools:
DeWalt orbiting sander - best sander for the job!
The Mouse - only used for the hard to reach spots
Dry Brush
Safety Masks - we're using protective respirators rated for harmful dust.

Oh yeah - and though we're trying to forget about it, we are only finishing one of the 4 sides of the house this year...

Sunday, November 3, 2013

Blogger Pizza Party!

This is Paige's third installment of blogger food parties and I've loved everyone of them.  
Remember the tacos? and chili?  Today Paige asked us to have a party for a food that's had a party about it for a long time - Pizza!


BBQ Chicken Pizza with Arugula
So, this recipe is only half mine.  The BBQ pulled chicken is something I saw on Food Network by Ellie KriegerWe love the BBQ sauce from this recipe and that is uses a store bought roasted chicken, great when you have very little time.  Another great part is that if you get a large chicken you’ll get at least two meals out of this for a family of four.  (We’re not a family of four yet, we just eat like one!)

So make the BBQ pulled chicken sandwiches and save your left overs for this great pizza!

BBQ Chicken Pizza with Arugula Salad
Prep time: 10 min
Cook Time: 15-20 min

Ingredients:
2 cups of leftover BBQ pulled chicken (recipe here)
1 ½ - 2 cups of smoked mozzarella cheese, shredded
1 premade pizza dough such as buttoni
1 cup Arugula
pinch of salt
Juice of ¼ a lime
1 tsp. Extra Virgin Olive Oil

Preheat your oven to 400 degrees.

We use the premade pizza dough here instead of raw dough because it stands up better to the loads of BBQ chicken we add on.  Top pizza dough with BBQ chicken, then smoked mozzarella and cook for about 15-20 minutes.    While the pizza cooks, prepare the arugula salad.  Combine salt, lime juice, and oil in the bottom of a bowl, toss with arugula.  Top the pizza with Arugula salad before slicing. 


Make sure you check out the Pizza's our blogger friends made in honor of today!
Paige from Little Nostalgia
Kristen from Milo and Molly
Heidi from Rowhouse14
Marilyn from Pulp Sushi
Meg from 18 Preston
Kelsey from Be Like the Fox

And just to remind you one more time - the sandwiches are delicious as well!  Enjoy!


Monday, October 14, 2013

Biggest DIY yet!

Yes - you're seeing that correctly.  We have taken on a full exterior paint job as a do it yourself project.  I can't say we won't hire a professional before this whole thing is done - but for now we are seeing what we can do.  We've started on the back side of the house and hope (NEED) to finish this side before our New England Winter shows up.


Steps taken so far:
  • Scrape any old paint that will come off
  • New paint colors selected

Steps needed before winter:
  • Finish the never ending scraping
  • Sand all cedar shingles
  • Prime everything
  • New PVC window trim
  • Flash AC unit
  • Correct bad flashing job on porch roof
  • Final coat of paint (if this can't happen, we'll need to prime again in the spring)

What we've learned so far:
  • Residing a house is expensive! We've priced out DIY options of just stripping the whole house and starting fresh with new shingles but we have red cedar (which are the best you can buy) and the cost to replace would be crazy.
  • Don't caulk between every single shingle.  Sealing up the whole house with caulk = a house that can't breathe.  And a house that can't breathe = bubbling paint everywhere.
  • A pressure washer cannot replace human scraping.... bummer.
  • You get killer calf muscles when you're on a ladder all weekend.
The scraping supply bucket: safety glasses, variety of scrapers, bee spray!
We have a decent routine now for set up, clean up, and take down each night so that we're not spending too much time setting up our work space each day.  We'll keep you updated as we progress and what else we learn in the process.


Friday, October 4, 2013

Smoked Garlic Mushrooms

Smoked Garlic Mushrooms
We eat these as just a side dish; they also go great as steak, chicken, or burger toppings.


Prep Time: 10 minutes
Cook Time: 20 minutes

Ingredients:
1lb Baby Bella Mushrooms – sliced (you can use button mushrooms, but bellas are the best)
2 Garlic Cloves – minced
1 tbsp Unsalted Butter
1 tsp. smoked paprika
¼ cup Parsley - chopped
Salt & Pepper

Instructions:
Melt butter in a sauté pan (or on the grill in any grill safe cooking vessel) on medium heat.  When the butter is melted, add mushrooms, salt and pepper (a good 1/4 tsp of salt) and about a ½ tsp of smoked paprika, depending on how smoky you like it.  Sauté mushrooms until soft.  When mushrooms are done toss with parsley.


Smoked Garlic Mushrooms top an 80/20 all beer burger with smoked Gouda cheese on a wheat bun.  The Patron tiki torch bottle project can be found here.

Sunday, September 15, 2013

Deli Mustard Chicken and Summer Salad Bar

Deli Mustard Chicken and Summer Salad Bar


The Challenge: got home from a 2 week vacation the night before, having parents over for dinner to view vacation photos, and Mom is on a lean and green diet.

Challenges are my favorite way to come up with new things to cook.  It forces me to think more creatively and try something new based on the challenge restrictions.  In this case a lean and green meal was required, and something I didn't have to slave over considering there wasn't any food in the house and the humidity was killing us.  And time couldn't have been better because a Whole Foods opened about 1 mile from our house that I wanted to explore anyway.

The Plan: Chicken was my first thought because it takes a quick marinade well and I can grill it in no time.  And I wasn't quite sure about all of my mom’s diet restrictions so I went with a deconstructed salad, or salad bar with some special ingredients.

Deli Mustard Chicken
Prep time: 5 min
Cook Time: 10 min

Ingredients:
2 chicken breasts – butterflied into two thin pieces each and 4 large boneless skinless chicken thighs
¼ cup deli mustard – or Dijon with whole mustard in it
2 tbsp olive oil
2 tbsp white wine
Instructions:
Whisk together mustard, oil, and wine in a large bowl.  Toss chicken to coat and leave covered in the fridge until ready to grill.  I recommend about an hour, and no more than three hours.  When your dinner guests arrive you just need about 10 minutes to grill the chicken over medium high heat.  I grill 7 minutes on one side, flip and finish for about 3 minutes on the other side.

Summer Salad Bar
Prep each of the different elements before dinner, cover and refrigerate in separate serving bowls.  When your guests arrive; set out the different items for a build your own salad bar.

The Greens
Prep Time: 5 min
Ingredients:
2 cups baby kale
2 cup of baby spinach
2 cup of mixed greens

Toss greens together and they can be refrigerated in a serving bowl. Most people are used to mixed greens and baby spinach, but this mix is a great way to get the healthy kale hidden in there.

Assorted Tomatoes
Prep Time: 5 min
Ingredients:
1 cup cherry tomatoes halved
1 cup yellow pear tomatoes halved (or 2 cups of whatever tomatoes you'd like.)
1 tbsp Olive Oil
1 tbsp Apple Cider Vinegar
Salt & Pepper

Whisk together 1 tbsp. of good olive oil and 1 tbsp. of apple cider vinegar, salt and pepper, in the bottom of a serving bowl.  Toss the tomatoes and refrigerate up to 1 hour.

Pickled Vegetables
Prep Time: 15 min
Ingredients:
1 cucumber - sliced in half moons
1 small zucchini - sliced in half moons
1 red onion - quartered then thinly sliced
1/2 cup white vinegar
1 cup water
1/8 cup of pickling spice - Ball Kosher Dill Pickling Mix

Stuff the cut vegetables into a 1 quart jar – or you a large bowl.  Prepare the pickling liquid by combining water, white vinegar and pickling spice in a small sauce pan. Heat to a boil over the stove.  Pour hot liquid over the vegetables.  Let vegetables cool on the counter for a half hour then move to the fridge for at least an hour and up to three weeks.  Strain before serving.

Herb Goat Cheese
Prep Time: 5 min
Ingredients:
4 oz of plain goat cheese
pinch of salt
pinch of pepper
1/4 tsp. red pepper flake
1 tsp. of dried rosemary
1 tsp. of dried parsley

Combine all ingredients thoroughly with a fork, refrigerate until ready to serve.


Mustard Vinaigrette
Prep Time: 5 min
Ingredients:
1 tbsp. of mustard
pinch of salt and pepper
1/8 cup of apple cider vinegar
1/8 cup of white wine
¼ cup of good olive oil for the dressing

I like to shake up my dressing in a ½ pint jar or whisk in a bowl.  Combine all ingredients and refrigerate until ready to serve.

Sunday, September 8, 2013

Blogger Chili Party!

Do you remember the blogger taco party?  Well, it's football season and what better way to kick it off than with a blogger chili party?  My Turkey Pumpkin chili is still a bit of a work in progress (recipe perfection takes time my friends) but I still had to share what I made.  Also - please excuse the sub-par iphone photos.  I totally forgot I lent my camera to my sister this past weekend!


This recipe is inspired by the Pork-and-Pumpkin Chili from Food Network Magazine - though I've made plenty of modifications that its hardly the same.  I actually wasn't able to eat this the first few times I made it because the original recipe was so spicy!  The biggest change was switching to turkey from pork, and I do not add the chipolte peppers in the chili - instead I added about 1/2 tsp of just the sauce to the pumpkin sour cream.  I also choose kale instead of mustard greens because it's easier to find.

I always start with roasting the poblano peppers (and another random hot pepper) over my gas stove.  You can also do this under the broiler in the oven, just keep a really close eye on them.  It takes about 5 minutes to really char the whole pepper.


Then wrap them up tightly in aluminum foil.  You're going to want them to hang there for a good 20 minutes so this is a perfect do ahead while prepping everything else.  This foil packet will let them steam, after 20 minutes, or when cool enough to handle, rub off the skin with a paper towel.  No need to go nuts here, just rub of what you can - it should be about 75% of the skins and dice the peppers for the chili - throwing out the seeds.


Most soups, stocks, and slow cooking stews like a chili have some kind of holy trinity of starter veggies - these are mine.  One big white onion diced, 3 cloves of garlic minces, and the 2 hot roasted peppers diced.


These guys go in the pot with chili seasoned turkey tips, 2 tbsp of tomato paste and 2 tbsp of flour before adding in a can of chick peas, a can of fire roasted diced tomatoes, all but 1/4 cup of the pumpkin puree and a bottle of beer.  I recommend a brown ale or American Oktoberfest.  Once you're about a half hour into the chili doing it's simmering thing - I add in ribbon sliced kale.  Don't forget to de-rib the kale!


The kale needs about 5 minutes to cook down into the chili.  Then serve with a sour cream mixture of 1 cup sour cream, 1/4 cup of pumpkin, and 1/2 or 1 tsp (depending on your spice tollerance, mine is low) of the chipolte sauce.  A lime wedge is also a nice touch.  


 Now who's ready for some football!  Go Pats!
(Sorry for an imperfect recipe - an update will be available in the near future - in time for many more fall football games!)

Monday, September 2, 2013

Guest Bedroom - DONE!

Does anyone remember our little story about using our three day Memorial Day weekend to bust out a guest bedroom renovation? 
Does this before photo jog your memory?


What about this gorgeous inspiration board that Paige at Little Nostalgia put together for us?  Paige is currently studying interior design and she couldn't have been a more perfect designer to work with.  We have similar taste, and she has the skills to put everything together and provide a cohesive look for a space.


Have you caught on yet that I said Memorial Day weekend and here we are at the next three day weekend of the year in September?  Have you found the irony in the print Paige picked out above and provided us February 21st? So this projected ended up being a bit more complicated than planned - and we added a bit more scope than what Paige gave us. (Matt's working on installing new recessed lighting as I put this post together. But I couldn't wait any longer to share this:


I'm going to break down this room using Paige's list of suggestions.  We did purchase a few new tools for the project, but since they are investment items and the only way I could get Matt's buy in to help me, those aren't included in the pricing below.

-- Since Meg and her husband are into DIY, I think they should go for the wood ceiling! I would go with white, since the room needs the illusion of height.
This was the hardest part of the whole project - but we are so glad we went for it.  There will be no how-to on this, because it's not perfect.  The beadboard comes primed, and we did make the mistake of using the semi-gloss trim paint we used on the ceiling... this will unfortunately need a coat or flat paint to hide the non perfect spots.  $350 

-- As for the walls, I'd do a pale blue to keep the open feel while adding a touch of color. It's hard to pick one online, but Breathless from Olympic could be a starting point.
We went with Behr Wave Crest in eggshell on the walls - an almost perfect match to Paige's suggestion.  It's a personal preference but I prefer Behr Premium Plus paint.  We also needed primer and I updated all the trim to a fresh new white coat matching Behr semi-gloss to a BM Chantilly Lace. $76


-- Some dark bamboo shades from Home Depot ($37/ea.) will add contrast and keep the room from feeling too light. Keeping the existing wicker chair and dresser and spraying them dark brown to match would also provide some richness.
Check and Check - we went with some faux wood shades in espresso ($61 for both) and spray painted the chair and dresser with Rustolem 2X in Satin Espresso.  $12


-- I would center the double bed under the window and add a simple nightstand from IKEA ($70) on the left to balance out the AC unit. And keep that metal lamp, too! It's cute.
I really enjoy the look of the one bed in the center - much more than the two mismatches sizes.  I scored the night stand at a yard sale for $5!  It was dark wood and from Ethan Allen.  I'm sure wood purists would freak out (that's like a $250 night stand) but I sanded it down and sprayed it with Rustoleum 2X in satin Lagoon. $17


-- A turquoise throw pillow also from IKEA ($7) would work well in the chair. If a guest gets cold, a simple white quilt ($40) would be nice at the foot of the bed.
I'm so glad my mom taught me how to sew! - I purchased white and light blue linen fabric and made the simple cafe curtain and all the pillow covers.  The pillow inserts came from the craft supply stash. $20


-- Meg already has some colorful art, but if she needs more this print from Etsy would be fun ($18).
We actually haven't hung the art yet - but I decided to also include a print on the nightstand.  This one was also from an Etsy seller!  And she happens to be local to where I work in Boston.  $30 including the frame.


The last piece of scope we added was to replace a low ceiling mount light fixture with three energy efficient recessed lights.  $133

Grand Total: about $700.  We're happy with that number.  We got to it because of the DIY curtains and pillows, already owning all the bedding, accessories, and small light fixtures, and the super steal on the nightstand.  Not a bad transformation.


Sunday, July 28, 2013

Shrimp Tacos w/Red Cabbage Cilantro Slaw and Chipolte Sour Cream

When Paige mention the possibility of a taco blog party I was in!  Who doesn't love tacos?  They are incredibly easy to prepare and relatively healthy.  My version of a shrimp taco is also gluten free because of my current needs.  Corn tortillas are naturally gluten free, but since they are a soft taco I add  a bright red cabbage cilantro slaw for the crunch in a perfectly textured taco.

Shrimp Tacos w/ Red Cabbage Cilantro Slaw and Chipolte Sour Cream


Prep Time: 20 minutes
Cook Time: 10 minutes
Makes 6-8 tacos

Ingredients:
¼ head of red cabbage, thinly sliced
Small handful of cilantro, chopped
¼ tbsp. apple cider vinegar
1 tbsp. olive oil
¼ cup sour cream
1 tsp. sauce from a can of chipotle peppers in adobo
18 – 24 shrimp, peeled and deveined
Juice from 1 lime
6-8 corn flour tortillas

Instructions:
Cabbage Slaw: combine cabbage, cilantro, vinegar, and ½ tbsp. of olive oil in a bowl.  Season with salt and pepper.  Keep refrigerated until ready to serve, can be made ahead.

Chipotle Sour  Cream: combine sour cream and adobo sauce.  Keep refrigerated until ready to serve, can be made ahead.


Shrimp and Tortillas: marinate shrimp in the juice of ½ a lime and ½ tbsp. of olive oil.  Season with salt and pepper.  Can marinate up to ½ an hour in the fridge.   While the shrimp is marinating, toast the tortillas in a dry skillet one at a time until just small bits are golden brown.  Transfer warmed tortillas inside aluminum foil to keep warm until ready to serve.  Saute shrimp in skillet, about 3-5 minute per side.  Assemble tacos with slaw first, shrimp, and chipotle sour cream.